
Education Robot Project
Manufacturing Education Robot Project
Project Info
2023 Oct – 2024 April, Engineering Lab Course - EGN 3000 at University of South Florida
| 🔬 Team | Lauren Song, Fabian Martin, Robert Tortolo, RC Wyatte, Erik Langschwager |
Executive Summary
Our project focuses on the development of Wheelie, a kid friendly robot designed for K-12 STEM education. The objective is to create an accesible learning tool that encourages engagement and exploration among students while also addressing the barreirs to entry into engineering education.
Wheelie boasts a simple yet engaging design, featuring a rounded box-shaped body that can be effortlessly assembly by any users within minutes. Its mobility is ensured by wheels on both sides, supplemented by a fixed wheel at the back for stability. Equipped with an ultrasonic sensor, Wheelie can navigate its surroundings autonomously, detecting obstacles and adjusting its path.
To enhance interaction, Wheelie incorporates an LCD screen programmed to display expressive emoji faces. This feature not only adds an element of fun but also facilitates communication between the robot and its users.
Therefore, we considered various aspects to determine that Wheelie is the most suitable final candidate design, aligning with our project’s goal of enhancing diversity in learning activities for potential future engineers while lowering the barriers to entry into engineering education. By incorporating feedback from the survey, we ensured that Wheelie not only meets users’ preferences but also aligns with educational objectives in STEM fields.
Through this iterative process of analysis and optimization, we expect that “Wheelie” would be an ideal educational tool, fostering curiosity, engagement, and hands-on learning experiences among K-12 students.
Introduction
Our project’s main goal is to optimize the final design candidate, Wheelie, for K-12 STEM education and reduce the barriers to entry into engineering education. The purpose of this project is to broaden the diversity of learning activities for future potential engineers through the robot, Wheelie, which will be used as an educational tool. By integrating various features such as sensors, motors, and interactive LCD screens that display emoji expressions, Wheelie provides hands-on learning experiences that encourage curiosity and exploration. Through the assembly process, we aim to make engineering learning enjoyable and easily accessible, while encouraging students to interactively explore concepts in robotics engineering. Overall, our project, Wheelie, not only provides hands-on experience by assembling electronic components and understanding engineering theoretical concepts but also contributes to lowering the participation and entry barriers in the field of engineering, thus relating to K-12 STEM education.
Project-based learning primarily utilizes modular robot kits. These kits resemble LEGO in their format but feature limited design space to minimize assembly time. This provides students with a sense of satisfaction in assembly, while teachers can allocate sufficient time to introduce activity processes. Utilizing open-source platforms like Arduino further enhances the suitability for K-12 STEM education by offering reasonable pricing and expandable design space. [1]
Utilizing robots as learning tools in technology-based education grants students the right to explore their skills and knowledge during the learning process, thus fostering independence. Moreover, through such activities, knowledge can be advanced. As a result, the development of affordable educational robots over the past few years has demonstrated the promotion of STEM education by enabling the cultivation of various technological skills. [2]
Job-centered hands-on STEM learning in robotics engineering. Task-centered hands-on STEM learning approaches are effective in students’ educational robot learning. STEM education aims to develop the ability to autonomously explore and solve problems through technical practice. Utilizing edu-robotics as a bridge to integrate with other domains is helpful for practicing STEM as edu-robotics itself encompasses various knowledge and skills. STEM learning materials adopt project-based or problem-based learning approaches, emphasizing learners and encouraging students to integrate what they have learned to solve problems. For example, Arduino Uno is highly scalable among controllers, being smaller, lighter, cheaper, and easier to obtain learning resources and materials for programming. Learning materials emphasize that students can spend limited time and money applying what they have learned in practical tasks and building robots. [3]
The core technology used in our project is Arduino Uno R3, which falls under mechanical engineering. This includes an H-bridge for motor control, a sensor, and geared motors. Arduino facilitates user interaction and accessibility, making it easy to build prototypes for the project. Moreover, Arduino’s ease of access allows for the sharing of tutorials in the market, enabling us to implement programming that displays interactive emojis through an LCD screen, enhancing the efficiency of the project.
Project Plan
The total cost of our prototype is $39.11, maintainig the ottal budget just under $40.00. The Bill of Materials (Table 1) is attached below with the list of materials that were used and their cost for more details.
Bill of Materials
| Material | Amount |
|---|---|
| Arduino | $4.27 |
| Ultrasonic Sensor | $3.40 |
| Battery | $2.00 |
| 2-Pack DC Motors | $1.80 |
| 2-Pack of Wheels | $3.32 |
| 8GB Micro SD Card | $8.29 |
| 3.5” TFT LCD Display | $17.83 |
| Total | $39.11 |
Prototype Design
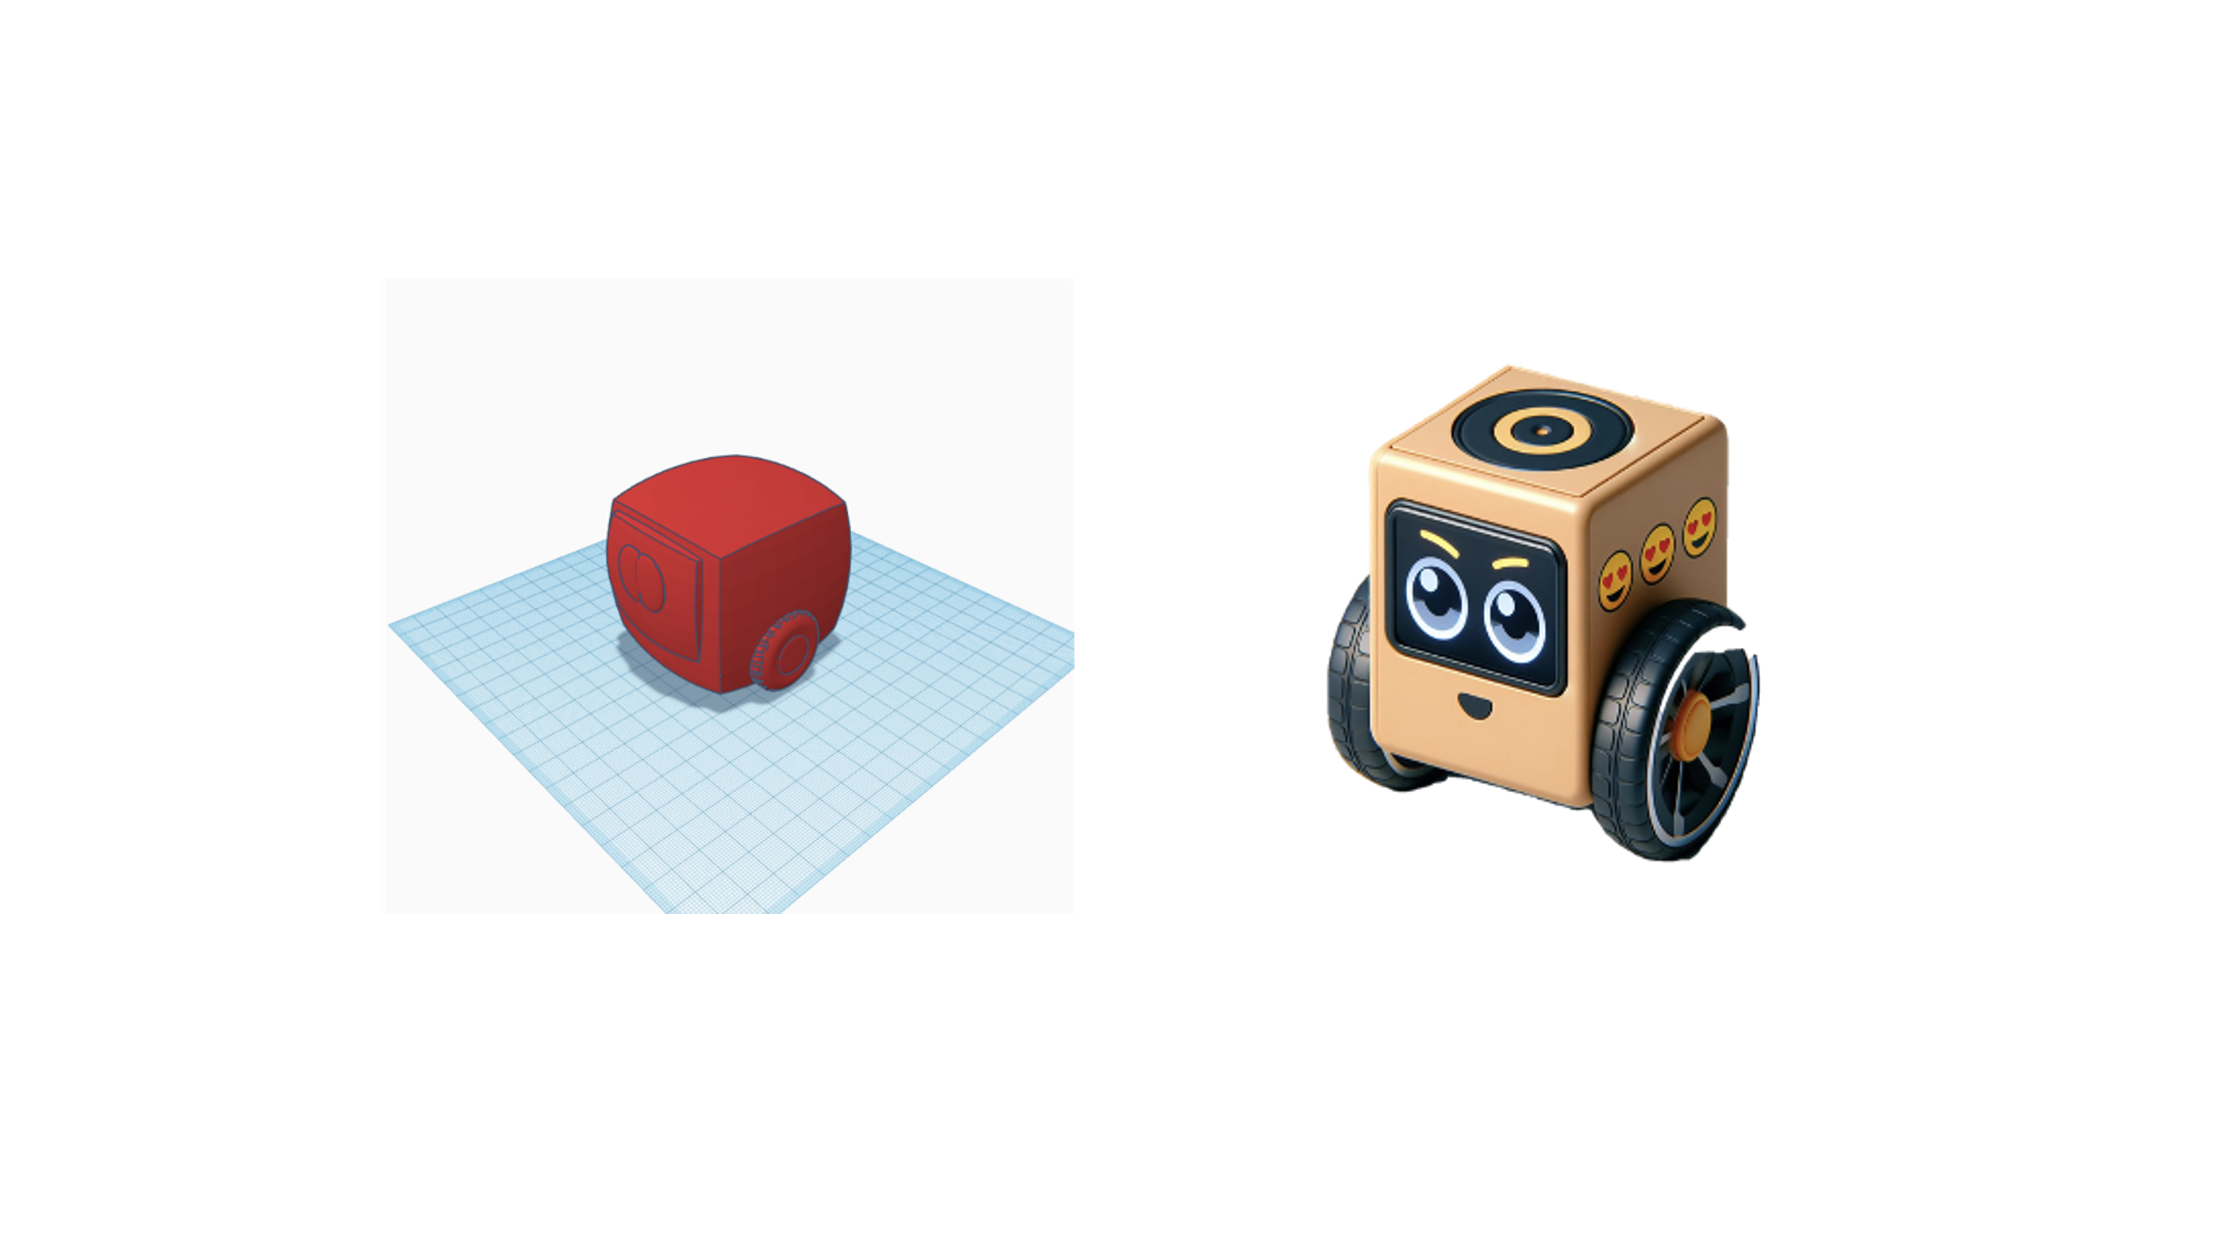
The chosen design, called Wheelie, was selected over other ideas for several reasons. Its box-shaped body with a minimalist approach and an LCD screen face allow for easy assembly within a few minutes by any user, unlike other candidates that are harder to assemble. Additionally, Wheelie incorporates three wheels for stability, making it suitable for navigating indoor environments typically found in schools. Lastly, considering the customer’s budgetary constraints, our candidate design ensures cost-effectiveness, with the cost expected to be under $40.
Final Candidate Design Calculations and Specific Components
Based on the Figure 1, our final candidate design calculations and specific components are:
- Box-shaped body (5.4” x 5.4” x 5.4”)
- LCD Screen face (3.15” x 2.76” x 3.46”)
- Two wheels (Diameter: 8cm)
- One fixed wheel (Diameter: 3”)
- Ultrasonic Sensor
- Two motors
- Power source such as 5V battery
- Arduino Uno
Product Development
The components are below:
- Box-shaped body
- LCD Screen face
- Two wheels
- One fixed wheel
- Ultrasonic Sensor
- Two motors
- Power source such as 5V battery
- Arduino Uno
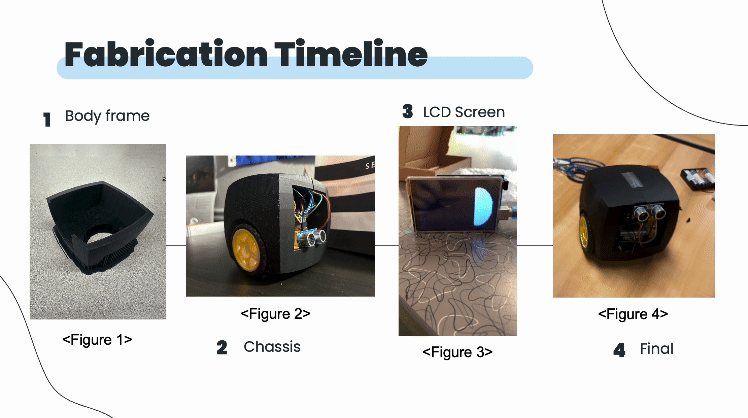
The fabrication method is below:
- Take the base component of the robot (chassis) and mount the Arduino Uno containing loaded in code.
- Mount each rotor in place using zip ties through the corresponding holes.
- Wire all hardware components to the Arduino Uno (left rotor, right rotor, LCD screen, ultra- sonic sensor, 5V battery) via color coded wires given.
- Attach wheels to both rotors.
- Mount ultra-sonic sensor to the corresponding marker in the front of the chassis.
- Mount LCD screen to the top piece of the robot designated by the corresponding marker.
- Connect top piece and chassis together via 3D printed pegs
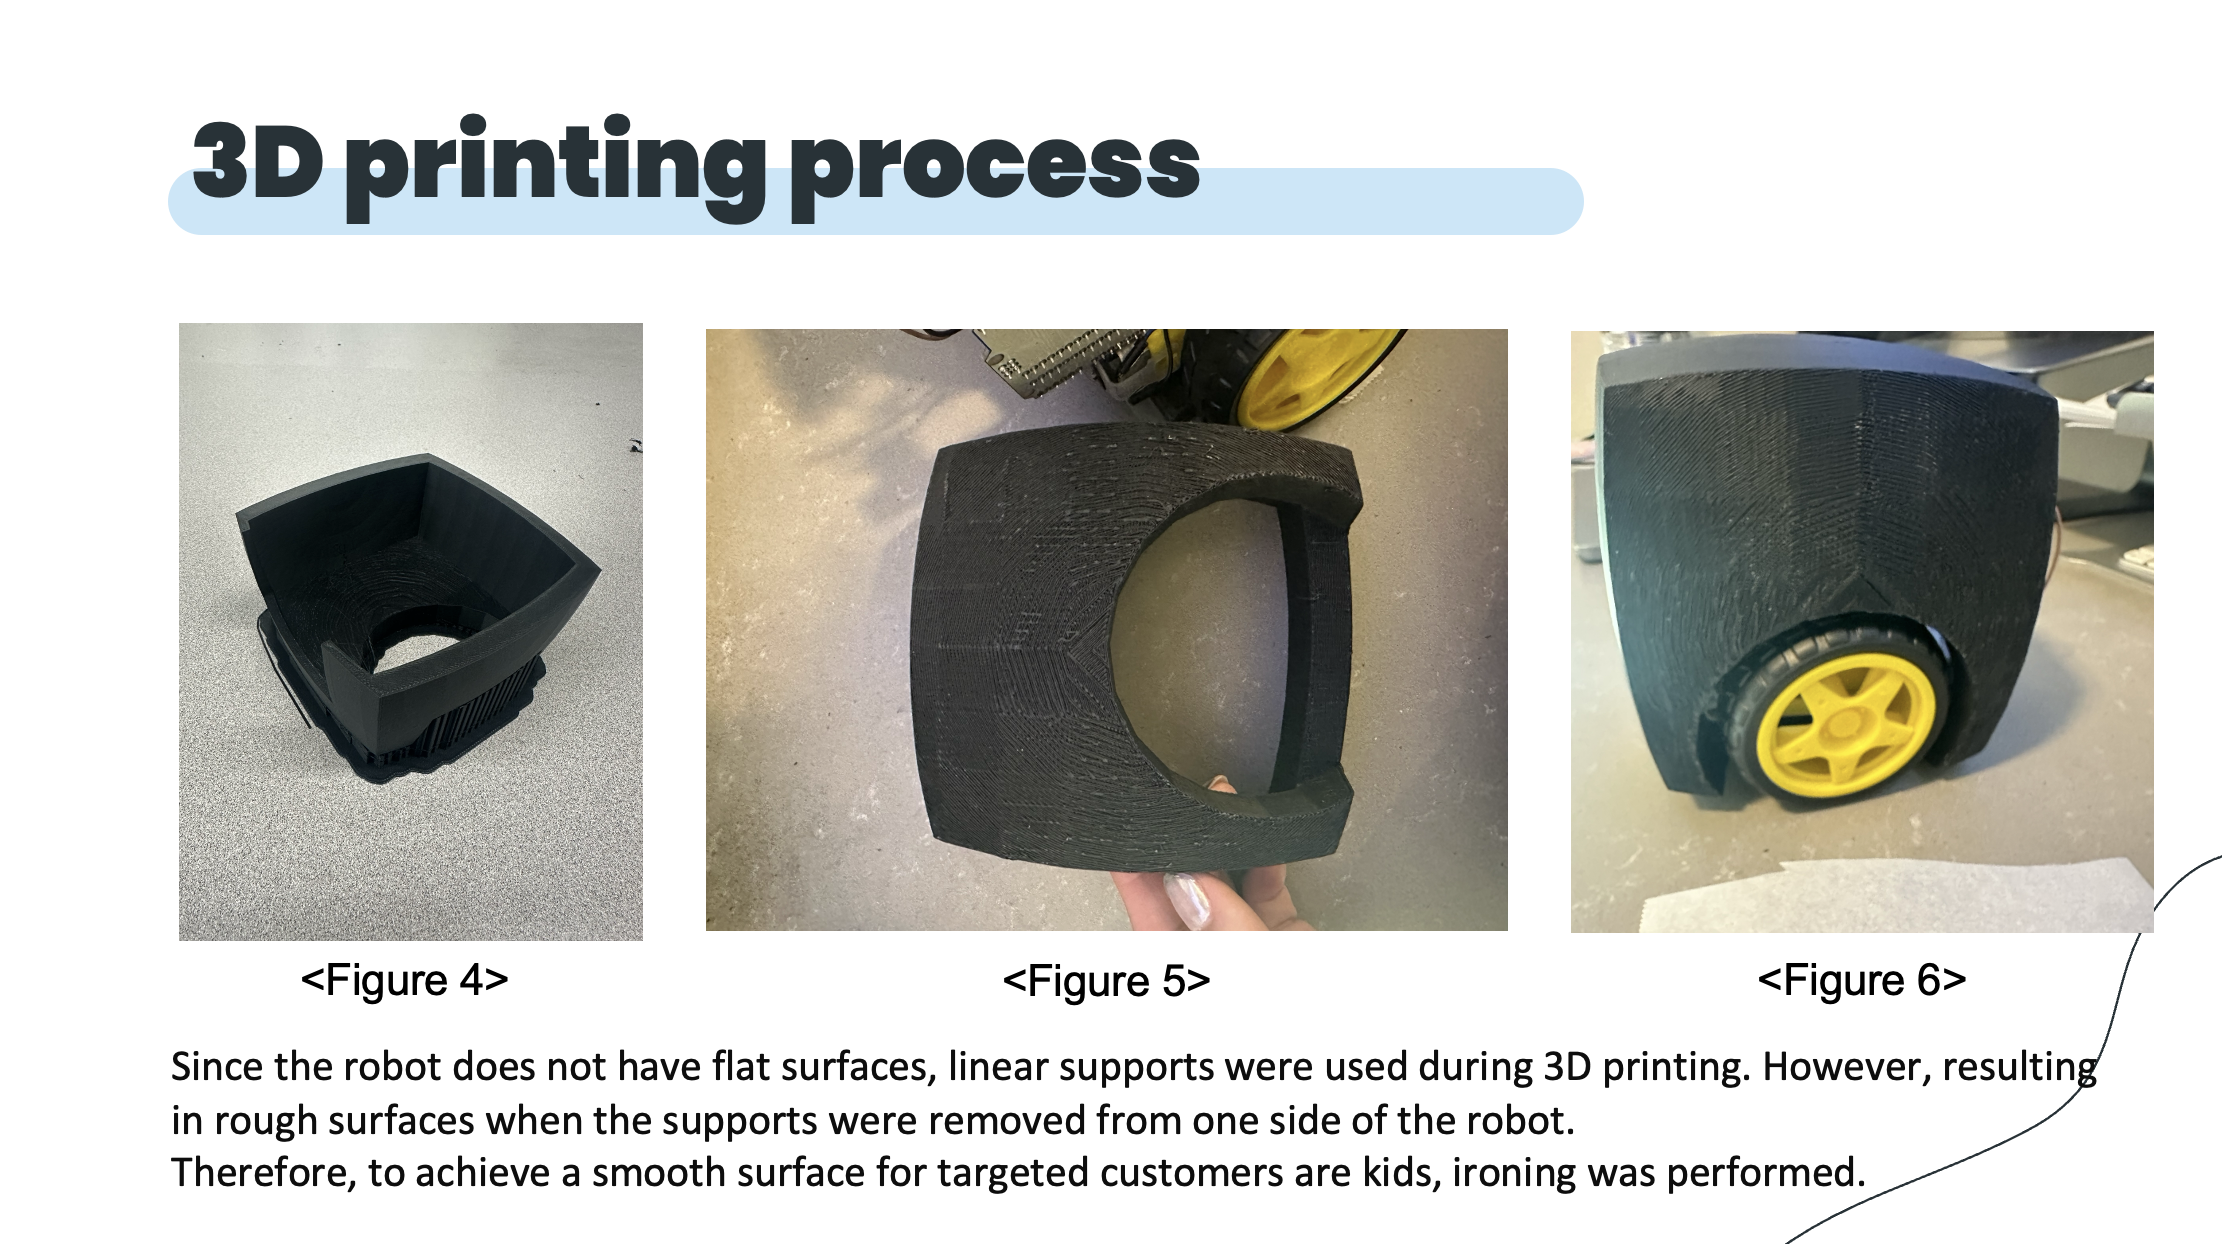
One challenge encountered was optimizing time management to meet the project deadline due to the extensive use of rafts and supports during 3D printing. Because our candidate design features a rounded box-shaped structure without flat surfaces, requiring numerous rafts and supports, the printing process took significantly longer.
Software Development
The first few lines of our code begin with including libraries for the motor control, ultrasonic sensor, and LCD screen. After that we declare a variable to store the measurement speed and distance, as well as setting all the pins for our motors. In our loop function, we have a while loop that makes sure the robot performs its functions while the distance measured is less than 30cm. When the distance is less than 30cm the robot will move forward until it gets too close to the user and continues to move in a different direction. Also, in the same loop our screen will display something as the robot performs its functions. (add pictures of the final code).
Because Wheelie is a two-wheel robot the movement is similar to the origami bot that was created earlier in the semester. The team would like to use the origami bot as a baseline for Wheelie but build upon and improve it, so it matches our specific goals. Here is the link for the function of the robot https://youtu.be/XMGxLdt6mHs?si=BQpDG6n1_YaJc_7K
The biggest challenge in programming the robot was putting all the different functions together. Since we know how we want each individual part to function and have the code for some of the parts, making it all work as one is challenging. For example, having the code for the motors and sensors individually, writing a program that can implement the two together and work how we want is challenging.
Prototype Testing
Prototype Overview
The prototype for Wheelie operates within the established parameters, such as compatibility with different environments like solid and carpet flooring. The risk of harm is minimal due to the limited exposed operating components (wheels) and the overall lightweight design. The hollowed plastic shell, measuring 5” x 5” x 5”, is sturdy enough to support the technological components and will not break unless subjected to significant force, such as being dropped or impacted by a heavy object.
Technical Specifications
| Net Weight | Actual Dimensions | Maximum Speed | Assembly Time | Power Requirement |
|---|---|---|---|---|
| 2 lbs | 5” x 5” x 5” | 5 MPH | 10 Minutes | 6000 mAh USB Power Bank |
The prototype meets the course engineering specifications for several reasons:
- Size Compliance: The packaging size does not exceed delivery requirements.
- Cost Efficiency: The incorporated technology is valued at $39.11, aligning with pricing constraints.
- Safety Standards: Wheelie’s speed, weight, and components ensure it is a safe toy for children, meeting ethical and engineering expectations.
Software Optimization
- The LCD screen required software refinement due to differences in size, pixel count, and brand.
- Without these refinements, custom images or text might not display correctly.
- The software has been optimized to ensure proper image and text rendering.
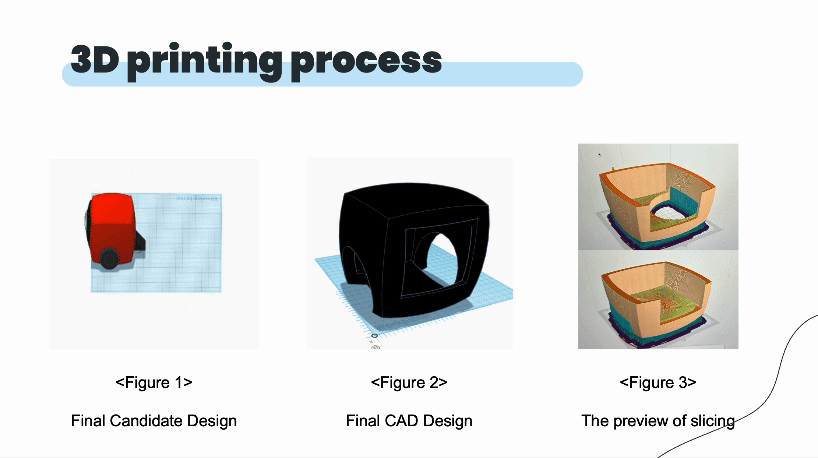
3D Printing Process
Below are images of the 3D printing process:

Conclusions
The primary objective of our project is to develop our robot to be suitable for K-12 education. Each field leader considered how to structure the robot, and ultimately, through the survey results of our final candidate design, we were able to better understand the customers’ needs. However, since we 3D printed the main body of the robot, we were limited by the size constraints of the 3D printer, but we were able to create a prototype that aligned with the customer’s work order and engineering specifications.
References
[1] M. E. Karim, S. Lemaignan and F. Mondada, A review: Can robots reshape K-12 STEM
education?, 2015 IEEE International Workshop on Advanced Robotics and its Social Impacts
(ARSO), Lyon, France, 2015
[2] Z. Abidin, R. Arifudin, and W. Hardyanto, Low-cost educational robotics for promoting STEM
education, IOP, 2021.
[3] C. Chi-Cheng, C. Yiching, Using mastery learning theory to develop task-centered hands-
on STEM learning of Arduino-based educational robotics: psychomotor performance and
perception by a convergent parallel mixed method, Taylor & Francis Online, 2020
Last updated: 2025-03-24